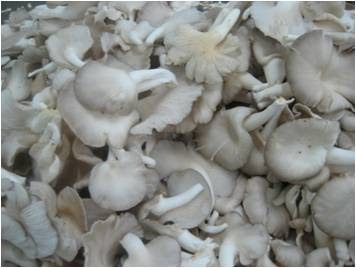
Introduction: Growing your own oyster mushrooms at home can be a rewarding and sustainable endeavor. Oyster mushrooms (Pleurotus ostreatus) are known for their delicate flavor and numerous health benefits. This step-by-step guide will walk you through the process of cultivating oyster mushrooms, allowing you to enjoy the fruits of your labor in just a few weeks.
Raw material that required for cultivation
- Oyster mushroom spawns
- Substrate: Paddy or rice straw
- Plastic bag
Starting a Mushroom cultivation in 6 Easy Steps
Take a paddy straw and cut the straw into 1 to 3 inch small bits. Heat the paddy straw in boiling water after that. Cook the straw with hot water(80 C) for half an hour, then remove the straw and empty it. Now spread the straw on a clean sheet of polypropylene and let it be 65 percent moisture content.
The pasteurized process completed taking a plastic bag with the paddy straw and mushroom spawn. fill two or three inches of paddy straw into the plastic bag. After that, spread the spawn on top of the bed. Repeat again fills you’ve almost filled the bag, Tie the bag top very tightly and put Ten to 15 small holes should be made on all sides, especially two to four holes in the bottom of the bag to breathe. Don’t forget to use 20-30 days old spawn is best for spawning.
After completing spawned bags are placed in the incubation room for mycelia growth. note the growing area of around 78 degrees F cooler temperature and dark place, keep away from sunlight.
After the bags are moved to a cool place for a day. it is time to place the bag in a brighter spot, for fruiting. It will allow mushroom growth to take place. After five to six days, spawns develop into mycelium. The mycelium starts spreading through the entire straw bag in 10 to 14 days. the next three to five days the, Oyster mushrooms ready for cultivation. The mushroom caps are fully separate from their stems, and it will ready for harvesting.
After the bags are moved to a cool place for a day. it is time to place the bag in a brighter spot, for fruiting. It will allow mushroom growth to take place. After five to six days, spawns develop into mycelium. The mycelium starts spreading through the entire straw bag in 10 to 14 days. the next three to five days the, Oyster mushrooms ready for cultivation. The mushroom caps are fully separate from their stems, and it will ready for harvesting.
After the bags are moved to a cool place for a day. it is time to place the bag in a brighter spot, for fruiting. It will allow mushroom growth to take place. After five to six days, spawns develop into mycelium. The mycelium starts spreading through the entire straw bag in 10 to 14 days. the next three to five days the, Oyster mushrooms ready for cultivation. The mushroom caps are fully separate from their stems, and it will ready for harvesting.
why Oyster mushrooms are so good for you
- Boosts immune system
- Cholersterol-free & fatfree
- Rich Protein & fibrer
- Very low in sodium iron, zinc, calcium, potassium, phosphorus & selenium
- Contains high levels of Vitamins B1, B3, B5 & B12 D, D3, D5 and A
- Anti-oxidant & Anti-cancer
Conclusion
Cultivating oyster mushrooms at home is a satisfying and sustainable way to enjoy this culinary delight. By following this step-by-step guide, you can create an environment conducive to the growth of healthy and flavorful oyster mushrooms. Experiment with different substrates and techniques to find what works best for you, and soon you’ll be harvesting your own batch of homegrown oyster mushrooms.


